Chestnut Sanding Sealer: The Foundation of Perfect Wood Finishes
The Unsung Hero of Premium Finishes
When discussing our finishing process at NOIR.DESIGN, most attention goes to our topcoats—Osmo Hardwax Oil and Rubio Monocoat. But experienced woodworkers know that the foundation matters just as much as the finish. That's where Chestnut sanding sealer earns its place in our workshop.
Sanding sealer is the preparatory step that separates amateur results from professional-grade finishes. At NOIR.DESIGN, we use Chestnut sanding sealer selectively—not on every piece, but strategically where it delivers the greatest benefit.
What Is Sanding Sealer and Why Does It Matter?
Sanding sealer is a specialized preparatory finish designed to seal wood pores, stabilize the surface, and create an ideal foundation for topcoats. Think of it as primer for wood—it addresses issues before they become problems.
Wood is a porous, absorbent material with varying density across its surface. End grain absorbs more finish than face grain. Softwoods absorb differently than hardwoods. Some species (like pine) are prone to blotching. Without proper preparation, these inconsistencies show through in the final finish.
Chestnut sanding sealer addresses these challenges by:
- Sealing wood pores to control absorption
- Raising and stabilizing wood fibres for smoother sanding
- Preventing blotching and uneven colour
- Reducing topcoat consumption by limiting absorption
- Creating a uniform surface for consistent finish application
Why NOIR.DESIGN Chooses Chestnut
We've tested numerous sanding sealers over the years, and Chestnut consistently delivers superior results. Here's why it's our choice:
Fast Drying: Chestnut dries in 15-30 minutes, allowing us to maintain efficient production schedules. We can seal, sand, and apply topcoat in the same day.
Easy Sanding: The formulation contains sanding agents (typically zinc stearate) that make it exceptionally easy to sand smooth. It doesn't clog sandpaper like some sealers, and it cuts cleanly without gumming.
Excellent Build: Chestnut builds quickly with good solids content, meaning fewer coats are needed to achieve proper sealing.
Compatibility: It works beautifully under both Osmo and Rubio, as well as lacquers, varnishes, and other topcoats we occasionally use for special projects.
Clarity: Chestnut dries water-clear without yellowing, preserving the natural wood colour—critical for our Nordic aesthetic.
Value: At approximately £15-20 per litre with excellent coverage (12-15m² per litre), it's cost-effective for professional use.
When We Use Sanding Sealer
We don't use sanding sealer on every piece—it's a strategic choice based on the wood species, desired finish, and application. Here's when we reach for Chestnut:
Softwoods (Pine, Cedar, Fir): These woods are notoriously prone to blotching when stained or oiled. Sanding sealer controls absorption and ensures even colour. Essential for any pine pieces in our collection.
End Grain: End grain absorbs finish like a sponge. We always seal end grain—on wall hooks, coat racks, anywhere cut ends are visible—to prevent dark, over-saturated areas.
Mixed-Species Pieces: When combining different woods in our two-tone designs, sanding sealer helps normalize absorption rates so both species accept finish evenly.
Before Coloured Finishes: When using tinted Osmo or coloured Rubio, sealer prevents blotching and ensures consistent colour.
Porous Hardwoods (Oak, Ash): While these woods don't blotch like softwoods, sealing the open pores creates a smoother surface and reduces topcoat consumption.
When We Skip It: On dense, even-grained hardwoods like maple or cherry receiving clear oil finishes, we often apply Rubio or Osmo directly to raw wood. The natural density provides sufficient control.
Our Application Process
Proper application of sanding sealer is straightforward but requires attention to detail:
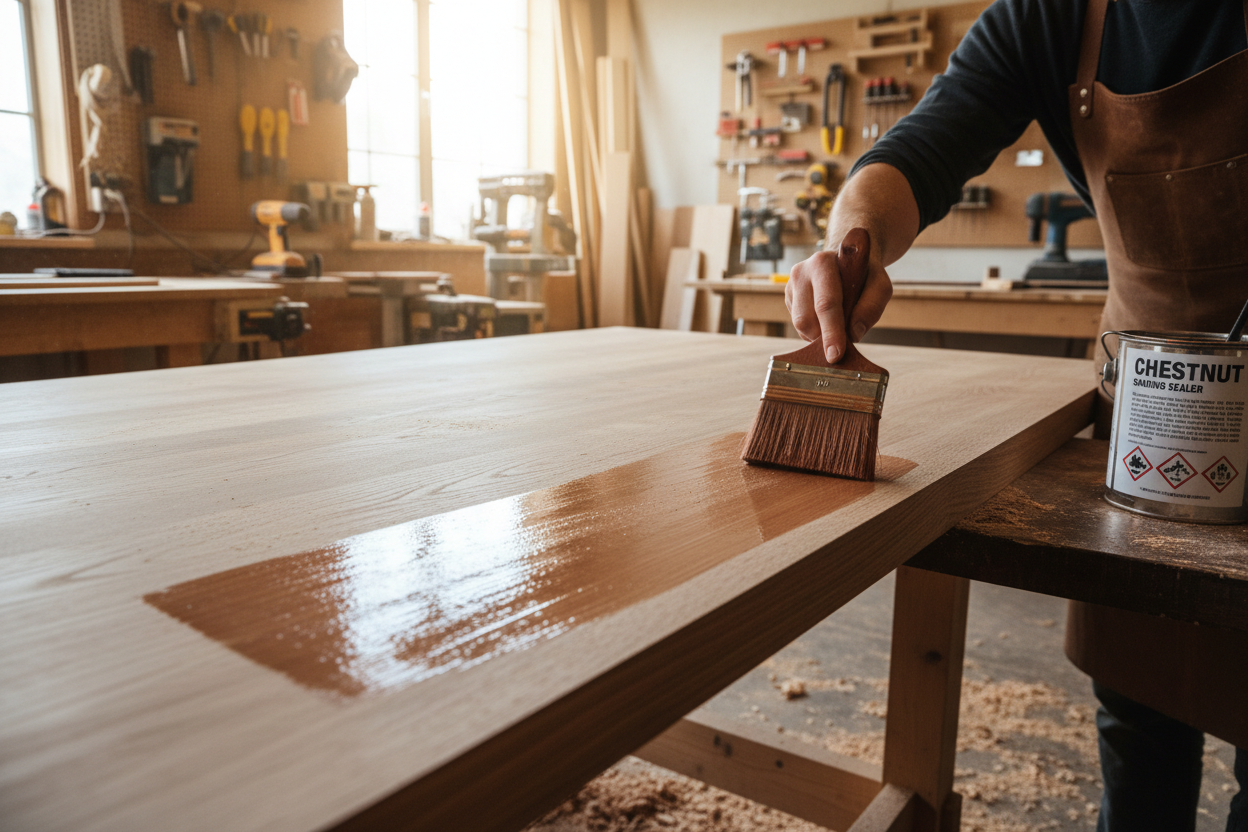
Surface Preparation: We sand to 180 grit and remove all dust thoroughly. Any dust or debris will be locked in by the sealer.
Application: We apply Chestnut sealer with a brush or cloth, working quickly to maintain a wet edge. Coverage doesn't need to be perfect—the goal is sealing, not building a finish coat.
Drying: We allow 20-30 minutes drying time. The surface should be dry to the touch but not fully cured.
Sanding: This is the critical step. We sand with 240-320 grit to remove raised grain and create a perfectly smooth surface. The sealer sands easily—we're looking for a uniform, silky feel.
Dust Removal: We remove all sanding dust with tack cloths or compressed air. Any dust left will show through the topcoat.
Second Coat (Optional): For very porous woods or when maximum smoothness is required, we apply a second coat, let dry, and sand again with 320 grit.
Topcoat Application: Once sealed and sanded, the surface is ready for Osmo, Rubio, or other topcoats. The sealed surface accepts finish evenly and beautifully.
Technical Considerations
Compatibility with Oil Finishes: Some woodworkers worry that sanding sealer will prevent oil penetration. With Chestnut, this isn't an issue when properly applied and sanded. The sealer controls absorption without completely blocking it. Both Osmo and Rubio bond excellently over properly prepared Chestnut sealer.
Grain Raising: Sanding sealer is designed to raise grain deliberately. This allows us to sand away the raised fibres, leaving a smoother surface than would be possible without sealer. Don't skip the post-sealer sanding—it's essential.
Build Thickness: We apply thin coats. Heavy application wastes product and creates unnecessary build that must be sanded away. Thin, even coats are more efficient.
Drying Conditions: Chestnut dries best at 18-25°C with moderate humidity. In cold or very humid conditions, drying time extends. We plan accordingly.
Problem-Solving Common Issues
Over the years, we've encountered and solved various sealer-related challenges:
Cloudy Appearance: Usually caused by applying sealer over damp wood or in high humidity. Solution: Ensure wood is completely dry and work in controlled conditions.
Difficult Sanding: If sealer gums up sandpaper, it's not fully dry. Solution: Wait longer before sanding, or use fresh sandpaper more frequently.
Adhesion Issues with Topcoat: Rare with Chestnut, but can occur if the sealed surface is contaminated. Solution: Wipe with white spirit before topcoat application to remove any residue.
Uneven Sheen: Caused by inconsistent sealer application. Solution: Apply more evenly, and remember that sanding will level everything out.
Alternatives We've Tried
Before settling on Chestnut, we tested numerous alternatives:
Shellac-Based Sealers: Traditional and effective, but slower drying and more finicky about humidity. Shellac also has a slight amber tint that affects colour.
Water-Based Sealers: Raise grain more aggressively and dry slower. Some compatibility issues with oil topcoats.
Vinyl Sealers: Build quickly but can create adhesion issues with oil finishes. Better suited for lacquer systems.
Dewaxed Shellac: Excellent sealer and compatible with everything, but requires mixing from flakes or has limited shelf life. Less convenient for production work.
Chestnut's combination of fast drying, easy sanding, excellent compatibility, and consistent results made it our clear choice.
Cost-Benefit Analysis
Adding a sealing step increases both time and material costs. Is it worth it?
For NOIR.DESIGN, absolutely. The benefits include:
- Reduced topcoat consumption (sealer costs £15-20/L vs. £25-60/L for premium topcoats)
- Fewer topcoat applications needed due to controlled absorption
- Elimination of blotching and colour inconsistency (avoiding costly rework)
- Superior final appearance that justifies premium pricing
- Reduced customer complaints and returns
The 20-30 minutes added to our process pays for itself in material savings and quality improvements.
Environmental Considerations
Chestnut sanding sealer is solvent-based (typically cellulose in solvents), which means it has higher VOC content than our water-based or oil-based topcoats. We manage this by:
- Working in well-ventilated areas
- Using only when necessary (strategic application)
- Proper disposal of waste materials
- Exploring water-based alternatives for future use (though none currently match Chestnut's performance)
The environmental impact is a trade-off we accept for the quality benefits, but we remain committed to finding more sustainable alternatives as technology improves.
Integration with Our Complete Finishing System
Sanding sealer is one component of our comprehensive finishing approach. Our typical workflow looks like this:
- Machine sanding to 120 grit
- Hand sanding to 180 grit
- Dust removal
- Chestnut sanding sealer application (when appropriate)
- Drying (20-30 minutes)
- Sanding with 240-320 grit
- Dust removal
- Topcoat application (Osmo or Rubio)
- Curing and quality inspection
We'll explore this complete process in detail in our upcoming post on the NOIR.DESIGN finishing workflow.
Tips from Our Workshop
After sealing hundreds of pieces, we've learned these valuable lessons:
- Shake or stir sealer thoroughly—solids can settle
- Use synthetic brushes—natural bristles can be damaged by solvents
- Work in sections on large pieces to maintain wet edges
- Don't over-apply—thin coats are more efficient
- Sand in the direction of the grain for best results
- Use a sanding block for flat surfaces to avoid creating low spots
- Check your work with raking light to spot any imperfections
- Store sealer in a cool, dry place and keep containers tightly sealed
Conclusion
Chestnut sanding sealer may not be the most glamorous product in our finishing arsenal, but it's one of the most important. It's the foundation that allows our Osmo and Rubio topcoats to perform at their best.
For anyone serious about achieving professional-grade wood finishes, quality sanding sealer is non-negotiable. It's the difference between good results and exceptional ones—and at NOIR.DESIGN, we're committed to exceptional.
In our next post, we'll compare these premium finishes side-by-side to help you understand when to use each one for optimal results.

Leave a comment
This site is protected by hCaptcha and the hCaptcha Privacy Policy and Terms of Service apply.